Tracheal T-Tube XL
Code: TML2
Description:
This T-tube has a thinner cephalic branch that facilitates its location in the proximal trachea, in the subglottis and, if preferred, through the vocal cords.
The external branch of the “T” tracheal tubes prevents displacement and allows aspiration of bronchial secretions.
Indications:
- Distal, precarinal and tracheal injuries
- Tracheal stenosis
- Subglottic stenosis
- Laryngotracheal stenosis
- After a tracheal resection and a termino-terminal anastomosis
- Tracheal reconstruction
- Larynx or trachea trauma
- Conventional tracheal cannula substitution
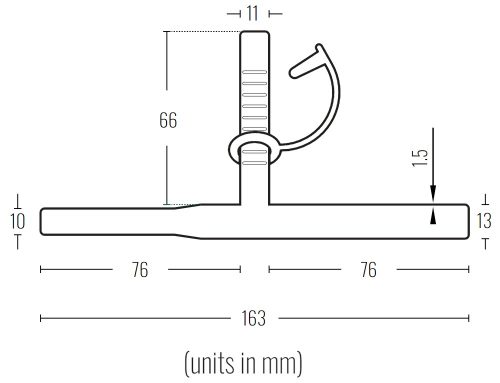
Due to the characteristics of the production process, the
measurements of the devices can vary by +/- 2%
- Medical grade silicone
- Bevelled edges to prevent granulomas
- Removable
- Surface of maximum softness to avoid adherence of secretions
- Transparent or Radiopaque
 |
 |
 |
 |
 |
Insertion:
The procedure is usually performed in the same operating room and under the effect of the general anaesthesia that was available for tracheal repair, but it can also be done under local anaesthesia.
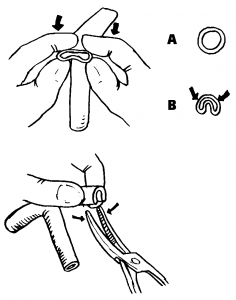
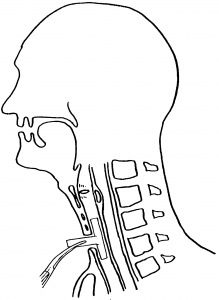
Two curved forceps and aspiration system will be required. The lower branch of the “T” tube must be folded at its end (fig.1), to facilitate its introduction through the tracheal osteoma.
The curved forceps will maintain the tube on a folded position (fig. 2).
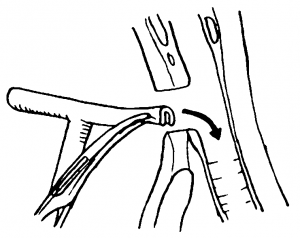
Then the assembly will be introduced inside the trachea through the tracheostomy hole (fig. 3).
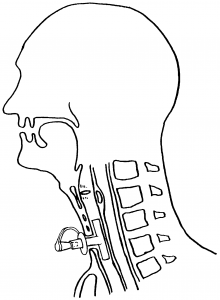
The second forceps will secure the t-tube by its external branch, thus avoiding an unwanted displacement (fig.4).
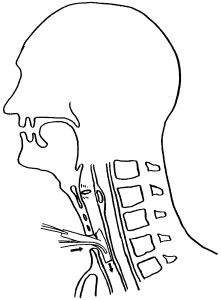
Mobilize the “T” tube until its upper branch enters the trachea and lodges on its inside, occupying the tracheal portion adjacent to the vocal cords (Fig.5).
Finally, the ring with the lid must be collocated on the outer branch of the “T” tube.
To do this, you can thread the ring in the forceps, grab the outer branch of the “T” tube and slide the ring until it is close to the neck’ skin, interposing a gauze between the skin and the ring.
Occlude the external branch with the provided lid.
The tape method:
It is a very clever and useful resource that consists of using a ribbon about 80 cm long, which can be carried out with a narrow bandage.
It must be introduced through the end of the external branch of the t-tube, and guided it all along the tube’s interior so that it gets out through the upper tracheal branch. Then you should take that bandage end and, with the help of a forceps, introduce it through the tracheostomy hole until it reaches the inside of the trachea.
A second long forceps is inserted inside the bronchoscope until it arrives and takes the end of the tape that had been left inside the trachea and, pulling on it, the tape then will travel around the inside of the bronchoscope or tracheoscope until it appears on the proximal end. So we have now a thin ribbon that enters the outer branch of the “T” tube and gets out through our bronchoscope.
As always, the lower branch of the “T” tube always lodges easily in the distal trachea, but the upper branch may remain folded, or half of its distance in the glottis’ direction. At the moment of tensing tape that we have placed, taking it by its ends, the branches of the t-tube will be easily aligned following the alternative that the tape occupies, accommodating the tube in a safe way.
Additionally, the tape method has the accidental displacement of the “T” tube during the implant manoeuvre.
Removal:
The tracheal t-tube can be easily removed by taking it by its external branch and pulling. This traction causes the fold of its internal branches that will meet, thus abandoning the trachea through the osteoma, following the direction of the force that pulls from it, from the outside. The removal can be done if the treatment time is completed or to carry out a t-tube replacement.
The most delicate extraction can also be carried out using a straight laryngoscope or a tracheoscope that, when introduced into the airway, allows to visualize the end of the t-tube.
Take the t-tube through the tracheoscope, while an assistant sections with a pair of scissors the outer branch of the tube at the closest point from the trachea. Next, the t-tube will be removed with a forceps through the tracheoscope channel.
Other forms of insertion and removal are possible depending on the experience and preferences of the physician.
Anaesthesia through the T-Tube:
Anaesthesia through the Tracheal T-Tube is possible.
The upper branch must be included to avoid the loss of anaesthetic gases.
This can be achieved by inflating the balloon of a catheter that, introduced nasally, must cross the vocal cords and lodge within the upper branch of the Stening t-tube. Since the tracheal t-tube lacks of an inflatable balloon, positive pressure ventilation can cause a variable loss of air volume administered, and will depend on the greater or lesser space between the wall of the tube and the trachea.
- Perform washes and aspirations frequently.
- Clean the skin that surrounds the tube a couple of times a day.
- Keep the external branch occluded to permit moist and warm air inhalation through the upper airway and reduce the volume of secretions.
- The instructions may vary in every case and must be adjusted and provided to the patient and his relatives by the physician.
Tracheostomy tube, non-reinforced, non-customized, single-use
A hollow cylinder designed to be inserted into an artificial opening made in the trachea (windpipe) during a tracheotomy to provide a patent airway; it is not custom-made for a specific patient and is not reinforced with a wire. It is typically constructed of plastic and may include an inner cannula. It is available in cuffed, uncuffed, and/or fenestrated versions, and in a variety of shapes and sizes. It is typically secured in position by a tracheostomy tube holder fastened around the patient’s neck. This is a single-use device.
35404